Okta SSO
Files.com supports Single Sign-On with Okta using either SAML or OpenID Connect (OIDC). We recommend using SAML if possible, because it is a more robust integration technology that supports more use cases, and it also offers seamless user and group provisioning using SCIM. Both sets of instructions are presented here. Note that you can also have more than one Okta instance or app connected to your Files.com site.
Below are the instructions for adding Files.com as an application in Okta for SAML integration.
After logging in to your Okta account as an administrator, navigate to Applications and click the Create App Integration button.

From the Create a new app integration window, select SAML 2.0 as Sign-in method and click Next.

In the form, enter "Files.com" in the App name field and click Next.
Complete the form using the following values (leave other fields at their defaults):
| FIELD | VALUE |
|---|---|
| Single Sign On URL | https://app.files.com/saml/consume |
| Audience URI (SP Entity ID) | https://app.files.com/saml/metadata |
| Default RelayState | [SUBDOMAIN].files.com (Replace SUBDOMAIN with your Files.com subdomain). |
| Name ID format | EmailAddress |
| Application username |
Then click Next, choose I'm an Okta customer adding an internal app (leave other fields at their defaults), and click Finish.
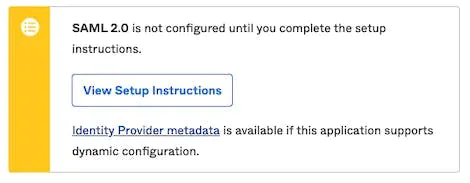
On the App details Sign On page, copy the Identity Provider metadata URL by right-clicking the link and selecting Copy link address. You will need this URL when adding Okta in Files.com.

Type "SSO Providers" in the search box at the top of every page and then click on the matching result. Click the Add provider button. Click to select the Okta provider.
There are three different ways you can connect to SAML provider:
In the Add provider form, select the Use SAML option, enter Display Name, and paste the Identity Provider metadata URL you copied from Okta into the Metadata URL field.
If you need to use metadata XML file to connect to Okta via SAML, as a Okta administrator, save the content of Identity Provider metadata URL to an XML file. In Files.com, select the option Metadata XML file and select the XML file you created from Okta.

If you need to use Certificate Fingerprint to connect to Okta via SAML, download the certificate from Okta application dashboard. To get the certificate and issuer URL, go to the application you created in Okta and click on Sign On > View Setup Instructions. Once the Certificate is downloaded on your local machine, run the following command using terminal to obtain the Certificate's Fingerprint
openssl x509 -in [your_cert_file] -noout -sha256 -fingerprint
In Files.com, select the Certificate Fingerprint option and paste the fingerprint you obtained from the above command. Also, paste the Issuer URL you copied from Okta. You can use the same URL for SLO endpoint and SSO endpoint also.

Lastly, click the Save button to apply the changes.
The Okta SSO method will now be available when assigning an authentication method for a user in Files.com, and the Sign in with Okta button will be displayed on your site's login page.
Below are the instructions for adding Files.com as an application in Okta via OAuth or OpenID connect (OIDC). If you plan to use SCIM for user and group provisioning, note that SCIM provisioning is only compatible with SAML-based integration, not with OAuth or OpenID Connect (OIDC).
After logging in to your Okta account as an administrator, navigate to Applications and click the Create App Integration button.
.webp?alt=media&token=0f45851a-ecc4-4639-8551-d1407d5348a7)
Select OIDC - OpenID Connect as sign-in method, and select Web Application as the Application type, and then click the Next button.

In the form, enter Files.com in the App Integration Name field, and enter the following URL in the Sign-in redirect URIs field. You can use the same URL for Sign-out redirect URIs.
https://app.files.com/login_from_oauth?provider=okta

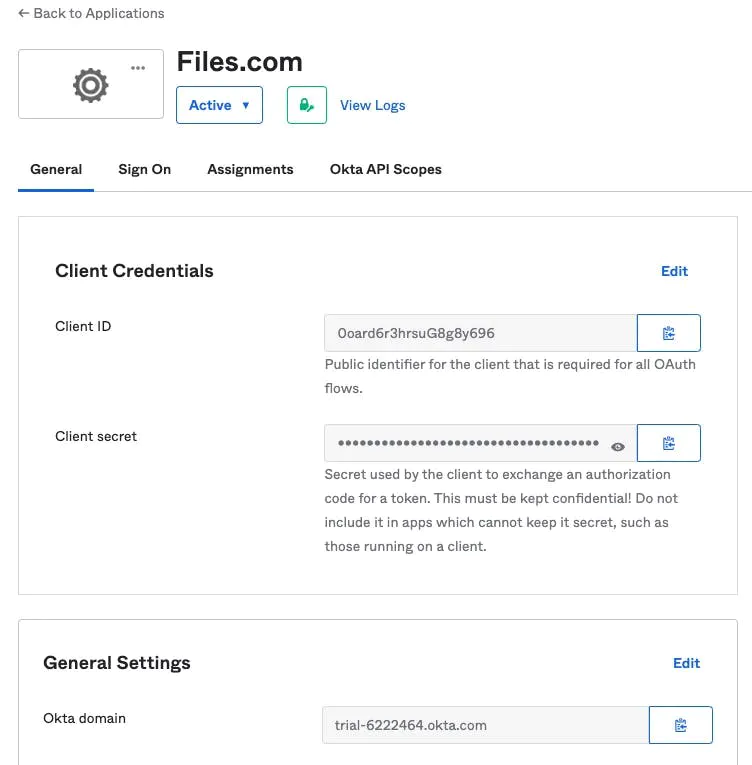
Click the Save button to finish adding the application. In the integration summary page, find the Client Credentials box. Click the clipboard icon next to the Client ID to copy it. Keep this browser tab open, as you'll be returning here to copy the Client secret later.

Type "SSO Providers" in the search box at the top of every page and then click on the matching result. Click the Add provider button. Click to select the Okta provider and select Use OAuth.
.webp?alt=media&token=4fe7d218-d385-4bb5-b1d3-94fb02d20b7d)
In the Add provider form, enter Display Name, enter your Okta subdomain into the Subdomain field, and paste the Client ID you copied in the previous step into the Client ID field.
Back in Okta, click the clipboard icon next to the Client secret to copy it, and paste it into the Client secret field in Files.com. Lastly, click the Save button to apply the change.

The Okta SSO method will now be available when assigning an authentication method for a user in Files.com, and the Sign in with Okta button will be displayed on your site's login page.
.webp?alt=media&token=590620c8-cfc9-4229-a221-8f38c13f46d1)
There are two ways to automatically provision users via Okta.
SCIM Provisioning is a standard that allows your Users to be automatically provisioned in Files.com from Okta. Note that SCIM provisioning is only compatible with SAML-based integration, not OAuth or OpenID Connect (OIDC).
First, you'll need to select the "SCIM" provisioning method in Okta at Applications > Files.com > App Settings > Provisioning.
Then use the following settings in Okta at Applications > Files.com > Provisioning > SCIM Connection:
| FIELD | VALUE |
|---|---|
| SCIM connector base URL | https://app.files.com/api/scim |
| Unique identifier field for users | |
| Supported provisioning actions | check all applicable actions |
| Authentication Mode | Basic Auth |
| Basic Auth Username and Password | Enter a username and password of your choice |
The username and password entered for Basic Auth will also need to be added as the SCIM username and password in Files.com. Type "SSO Providers" in the search box at the top of every page and then click on the matching result. Locate your Okta provider entry and edit to set Enable automatic user provisioning via SCIM? to Basic.
Lastly, in Okta at Applications > Files.com > Provisioning > To App, ensure that the Create Users, Update User Attributes, and Deactivate Users are in checked state.
After setting the above, your Okta users assigned to the Files.com application in Okta will be provisioned to Files.com and should be able to log in to Files.com via SSO.
Files.com offers numerous configuration options for SCIM provisioning, detailed in the Configuration Options section under our SCIM provisioning documentation.
JIT Provisioning operates by generating user records on Files.com upon their initial successful login. While this method is simpler than SCIM, it does have limitations. For instance, JIT can provision users but lacks the ability to delete or disable them. Files.com will automatically use Just-In-Time (JIT) Provisioning if you don't set up SCIM.
Get Instant Access to Files.com
The button below will take you to our Free Trial signup page. Click on the white "Start My Free Trial" button, then fill out the short form on the next page. Your account will be activated instantly. You can dive in and start yourself or let us help. The choice is yours.
Start My Free Trial